We live in a world where we expect most of our routine activities to either get automated or digitized in one way or another, don’t we? But one thing that you, as a coffee lover, should know is how to use a percolator. Trust me, it’s no rocket science after all.
Whether it’s our morning cup of coffee or tea, or the never-ending tasks and reminders on our phone – we expect machines to take care of all that. However, when it comes to the old-fashioned and traditional ways to make good coffee, a coffee percolator is your answer.
What is a Percolator?
The basic definition of the word ‘percolate’ is to filter through a porous surface of substance – essentially coffee beans in this case. The mechanism of a coffee percolator is entirely based on hot water, coffee beans and a kettle – and the way it lets the water trickle down till the coffee is brewed.
If you see an old school coffee maker at your friend’s place, you are probably looking at a coffee percolator. It is usually made up of three things – a pot, a chamber, a central tube and a section that holds the coffee beans. Hot water is poured in the pot, the tube allows it to travel through the upper section and that’s pretty much it.
[su_note note_color=”#FFFF66″ text_color=”#333333″ radius=”3″ class=”” id=””]Coffee is the second most traded good in the world second to only oil![/su_note]
Types of Coffee Percolators – In a Broader Perspective
To understand this better, let us first tell you the classification of coffee percolators that you might already have heard of:
- Stovetop Percolator
- Electric Percolator
- Siphon Brewer
- Filter Drip Brewing
- Moka Brewing
Stovetop Percolator
A stovetop percolator has a basic mechanism of letting hot water pass through the chamber and reach the ground coffee. This eventually leads to creation of thick and slightly bitter espresso aroma.
Electric Percolator
In the modern world, an electric percolator is known as a coffee machine. It uses electricity to run the boiler that, with other electronic parts within the machine, brews the coffee beans.
As far as coffee brewing methodology is concerned, there are a few coffee percolator categories:
Siphon Brewer
This is the one of the first brewing variations in coffee making percolation. Using a combination of percolation and infusion, the siphon brewer creates steam that makes the hot water reach the coffee ground container and mix with the ground coffee.
Filter Drip Brewing
In this type of coffee percolation, the water is not boiled to reach the chamber. Instead, a filter stops the coffee grounds passage in the filtrate and the rest of the process is based on gravity.
Moka Brewing
Commonly known as a moka pot, this is made by letting the heated water vapor originate from the bottom of the coffee brewer and take the coffee mix as it rises up to give you the fine bitter-taste coffee.
Now let us tell you the two broad categories in which all of the percolators fall:
- Gravity Percolator
- Pressure Percolator
Almost all the percolators that you will come across are the gravity percolators. The mechanism they follow is simple – the water boils up through the central tube and using gravity, it falls through the grinds.
On the other hand, the pressure percolator is basically a moka pot. They have pretty much the same methodology as a gravity percolator, except the part that it uses steam, just like an espresso machine, with water pressure that forces water through the grounds.
How to Use a Stovetop Percolator
So you think you are a true coffee lover and can make perfectly brewed coffee with the pour over, the espresso pull or the French press – but how about making it using a stovetop percolator?
Now that you know what different types of coffee percolators there are in the market today, this section will tell you how to use a stovetop percolator. Before you start with the percolating procedure, you need to make sure of two things:
- Medium Grind – It is advised to have a medium-sized grind. Too fine, it will get washed into your coffee and if too coarse, you might waste a lot of coffee.
- Control Water Temperature – One of the hardest things in percolating is making sure adequate water temperature is being provided. Too much heat and you will end up over-brewing your coffee with a bitter taste.
Things You Need
You will need the following items to make coffee using a percolator:
- Coffee beans
- Grinder
- Water
- Spoon
- Stovetop percolator
Steps to Make Coffee Using a Percolator
If you follow the steps mentioned in this guide, you will be able to get your desired coffee aroma and that taste you have been longing for.
Quantity of Your Coffee
This is one of the major factors that will play a vital role in the final taste of your coffee. Make sure your coffee and water composition is right, preferable 30 grams of coffee beans for every 500 ml of water.
You can vary this of course, depending on how rich or bitter you like your coffee. Once you know the percolating process, you can always try something new the next time.
Grind Coffee Beans
Once you know your coffee and water ratio, the next step is relatively the easier one – grinding of coffee beans using a grinder. Just make sure the grinder is not too small otherwise it will make your coffee extra bitter in taste. And if it’s too big, you will be wasting a lot of your coffee flavor.
Add Water
Fill your percolator reservoir with water with just the right amount as per your ground coffee and let it heat uniformly.
Add Coffee Grounds
Once the water has been added to the reservoir, now you can go ahead and add the coffee grounds in the coffee basket. Make sure you have the composition right – coffee percolators tend to make strong coffee by default, so it is advised to start with less coffee for the first time around.
Start Heating
Now you can put your percolator onto the stove and set the burner to low heat. Setting low heat means you will allow it to pass through uniformly, avoiding any unnecessary boiling and giving perfect brewing.
Keep an Eye
One of the most important things when it comes to making coffee using a stovetop coffee percolator is that you need to keep an eye during the whole process. This way, the coffee pot will not boil. A lot of models come with a glass or a plastic knob at the top. Once the water has reached the boiling temperature, you will be able to see it through this knob.
It is imperative to be careful about this part – As soon as you see the bubbles that occur with few seconds gap in between, then it means you should maintain this water temperature for perfect brewing.
If the bubbles get too constant or rapid, then you need to lower the heat as this will make your coffee overly bitter in taste. In contrary to this, if you do not see any bubbles after a while, that means the water is too cold and you need to turn up the heat.
In addition to this, during the process you will see the color of the water gradually change to coffee-brown. If this is happening, it means you are doing it right and within a few minutes time you will have your cup of Joe ready.
How Long to Percolate Coffee?
This is usually a deal-breaker when it comes to coffee percolating. Once you see the bubbles popping up at regular intervals, you need to set a timer for ten minutes tops. You can start with ten, and later on change that as per your coffee taste preferences.
Ten minutes usually gives a rich, old-school stovetop percolating taste to your coffee. However, if this doesn’t taste right to you, next time you can percolate it for a little longer than ten minutes.
Remove It from the Heat
As soon as your ten minutes timer is up, remove it from the heat. Be extremely careful during this process as the vessel will be very hot, so it is strongly advised to use an oven mitt or a towel to protect your hands.
Get Rid of the Coffee Grounds
Before sipping on that rich coffee cup, you need to first remove the coffee grounds. A lot of stovetop coffee percolators do not come with strong seals to separate the reservoir from the basket, so doing this step will save you from drinking more coffee grounds than coffee itself in your first cup.
However, if you like your coffee slightly bitter like I do, then you might as well add your used coffee grounds to your compost for a little extra bitterness to your coffee. If that is not the case, you can always use a filter while pouring coffee into your mug to avoid the bitter taste.
Your Percolated Coffee is Ready!
And that is pretty much it – easy isn’t it? Yes, that’s right. After my first experience with the stovetop coffee percolator, I had almost the same reaction, too! After that, it got a bit too easy and even fun as well.
Experimenting with your coffee composition and percolating time makes you explore new tastes of coffee that you previously might not have imagined.
Coffee Percolator – The Pros and Cons
Just like with any other product that is being used since decades, coffee percolators certainly have their advantages and disadvantages too. What are those? Let’s have a look at the pros first:
Compact Size – Portability & Mobility
Since these machines have a very compact design, they can come in quite handy if you are planning a road trip or going camping with your friends or family in the woods.
Single Cup of Joe? – Perfect!
It is relatively easier to brew small amounts of coffee using a percolator coffee pot. You don’t have to spend extra bucks on getting those drip coffee makers for single-cup brewing as your percolator will the do the job for you.
Durability
Most of the old-school aluminum or stainless steel percolator tend to last longer due to their fine build quality. This gives an extra edge over other types of coffee makers that require regular service and maintenance that eventually increases the cost of owning the machine.
Easy Clean Up
Coffee percolators are quite easy to clean. With no complex parts assembly, the machine can be cleaned by simply washing the filter basket, chamber and pot using regular water.
Environment-Friendly
Since stovetop percolators do not require filter papers or single-use cups at all, these are quite environment-friendly machines.
Now let’s have a look at the reasons why these machines have been taken over by electronic drip makers and espresso machines:
Bitter Taste
One of the major reasons that you do not see a lot of coffee percolators these days is that it makes coffee overly bitter. For some this might be the perfect way to drink coffee, however, a lot might disagree to this strong taste.
Active Brewing
Coffee percolators will require you to be keeping an eye during the percolating process. This means that unlike other types of coffee makers, you cannot leave the process unattended as it might over-brew your coffee if the heat is not turned off at the right time.
[su_note note_color=”#FFFF66″ text_color=”#333333″ radius=”3″ class=”” id=””]Did you know: Classical music legend Ludwig von Beethoven used to drink from a cup where exactly 60 coffee beans were used.[/su_note]
Best Coffee Percolator – Get the Right One
Well, if you have decided to try the vintage and old-fashioned way of brewing your coffee, you might want to do it with the right product, wouldn’t you?
Here are a few good options that you can get:
Farberware Stainless Steel Coffee Percolator – 12 Cup
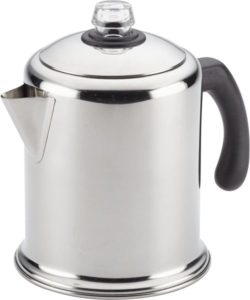
Stovetop coffee making always gives a rich and strong taste to those who know their coffee taste too well. The Farberware 12-cup percolator has been in the market for over 100 years, satisfying the coffee taste of many. It is certainly a good buy at a decent price range.
Presto 12-Cup Stainless Steel Coffee Maker
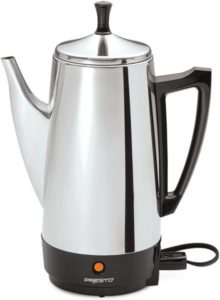
One of the better coffee percolators made from pure stainless steel, this is a decent purchase if you want to get 6-12 cups of rich coffee. It’s easy-pour spout and sleek design provides elegant coffee brewed at as fast as a cup a minute.
FAQs
How do you make coffee in a percolator?
To make coffee in a percolator, pour water in the bottom chamber of the percolator, then place it over the heat source.
How do you use a stovetop percolator?
Place the “spreader” on top of the grounds basket, and then snap the lid onto the percolator. Heat until the water boils, then turn the heat to a low temperature and let the coffee “perk” for several minutes before removing from the heat. Pour the coffee, and enjoy!
How long do you percolate coffee?
Brewing should take about 5 minutes for a stove top percolator and about 7-10 minutes for an electrical percolator.
Can you use ground coffee in a percolator?
You can use pre-ground coffee in a percolator, but be prepared for the dreaded sludge at the bottom of your mug. Most pre-ground coffee by default is prepped for automatic drip use so is far too finely ground to work well in a percolator.
Why is my percolator making weak coffee?
If you’re getting weak, watered-down coffee from your percolator, it’s likely a misstep on your part. Check your composition again.
Coffee Percolator – In a Nutshell
Yes, technological advancement has helped the world in a lot of different ways, without a doubt. However, there are and will always be a few things that just can’t be replaced. Coffee brewing using the old-school coffee maker is one of them.
These machines can be a good purchase if you are an avid coffee lover and just cannot live without it for too long, particularly during those long road trips and camping adventures where finding electricity could be a hassle.
Lastly, If you know your coffee taste and there is nothing in the world that will make you compromise on that, a coffee percolator might as well be your favorite coffee making machine till date.