
Given that a lot of us are dependent on coffee, it could be argued that we have an indirect dependence on coffee makers. Getting the right coffee maker is important to brewing a delicious cup of coffee. Not being beholden to the coffee maker is important too!
Knowing how to brew coffee without a coffee maker goes beyond simple dependence on the coffee maker. Many of these methods aren’t just workarounds for coffee makers, but actual useful techniques for brewing great coffee. Let’s see how it all plays out!
Basics Of Brewing A Great Cup Of Joe
Specific methods aside, some tips are pretty much evergreen ways to brewing delicious coffee. The coffee maker working right has a serious impact on extraction and how well the coffee tastes. These factors influence the flavor, aroma, and taste of coffee in a big way. Here’s what you need to know:
- Use Fresh Roasted Beans: Coffee beans can last a long time in storage after they’ve been roasted. However, freshly roasted beans offer the best of taste and flavor. Usually, coffee beans are at their prime within 1-2 days of roasting. They’re best used within four weeks.
- Fresh Ground Coffee: Whenever possible, grind coffee right before you intend to brew it. For best results, make ground coffee no more than 20 minutes before it’s needed. Freshly roasted beans and freshly ground coffee make a great combo. Make sure to use a burr coffee grinder to get the best grind.
- Water Temperature: Ideally, you should aim for a temperature of 195-205 degrees Fahrenheit. Boiling water is not the right fit for brewing good coffee. You can use a thermometer for precise measurement. Another useful way is to remove water from heat right before it boils and wait 30 seconds.
Method 1: Cowboy Coffee
Cowboy coffee is my top choice for brewing coffee without a coffee maker. It’s a straightforward method that brews a strong and full-bodied cup of joe. This method doesn’t require anything beyond conventional kitchen utensils, which is a win for low complexity.
This is a very useful method for when you’re outdoors and have caffeine cravings. Cowboy Coffee is also interesting in the way that it doesn’t require the use of a filter. Though you can use a strainer if you want to.
For best results, wear a cowboy hat and shoes!
Step 1: Making Preparations For Your Cup Of Coffee
Here’s what you need:
- Coffee grinds: Fine or medium grind
- A saucepan or similar utensil
- A ladle or strainer
- Sweetener, milk, or creamer (optional)
Step 2: Add Water To Saucepan And Heat
Add the required amount of water to the saucepan and turn on the heat. As a rule of thumb, you should add more water than required. For example, if you want one cup of coffee, add one and three-quarter cups of water. If you want two cups of coffee, maybe add three cups of water.
Some of the water will be absorbed by the coffee grounds. However, quite a bit of it will be left on the saucepan with coffee grinds as sludge.
Step 3: Steeping Coffee
This step involves most of the work that goes into brewing a perfect cup of cowboy coffee. As soon as the water reaches its boiling point, remove the saucepan from heat. Wait about 30 seconds before you add the coffee grinds, so the water can reach its optimal temperature for extraction.
Stir the mix so that the coffee grinds spread evenly. Now cover the saucepan and let it sit for a few minutes, so the coffee can brew. Waiting for about four minutes should be good enough. You can add or subtract a minute depending on how strong you want your coffee.
[su_note note_color=”#FFFF66″ text_color=”#333333″ radius=”3″ class=”” id=””]The amount of coffee you add depends on a preference. However, as a general recipe, one tablespoon of coffee for four oz of water works great.[/su_note]
Step 4: Pouring Coffee
In the time you give the coffee to steep, most of the coffee grinds will settle at the bottom of the pan. Use a ladle to scoop out coffee and pour it into your cup. Be careful so that you don’t disturb the coffee grounds settled at the base of the saucepan.
As an alternative, lift the pan and slowly pour coffee into the cup through a strainer. Though we’re using a strainer, we don’t want to disturb the grinds settled at the bottom of the pan. Moving slow and in deliberate motion is the right way to go.
Your surprisingly smooth cup of cowboy coffee is ready to enjoy!
Method 2: Turkish Coffee
Turkish coffee is a somewhat exotic and excellent method to brew a remarkable cup of coffee. This method is best for when you want a small serving – like an espresso cup. You can brew larger cups with it, but it may not be as convenient for the average coffee drinker.
Turkish coffee was extremely popular in the Ottoman empire. It has since expanded in popularity and is the “default coffee” in several nations around the world.
Step 1: Ingredients And Preparation
- Coffee grounds – medium grind
- Spoon
- Small pot
Step 2: Add Water And Coffee To Pot
Add about 5oz of water to the pot and put it on the stove. Add one tablespoon of coffee and if it is to your taste, a tablespoon of sugar as well. For most methods, I’d say sugar is optional and consider drinking the coffee black. However, for Turkish coffee, adding sugar enhances the flavor and taste of the coffee.
Step 3: Brewing The Coffee
Keep the pot over the heat while staying careful that the water doesn’t boil. The water-coffee mixture should be kept at the optimal temperature for extraction. So it is okay if the water is close to boiling, as long as it doesn’t actually come to boil.
During this process, foam will start to collect at the top of the coffee. As the foam gets thick, scoop it up with a spoon and pour it into a cup. You might have to repeat this foam removal for 2-3 times.
Step 4: Pouring The Coffee
After you’ve removed the foam a few times, switch off the heat. Allow the coffee grounds to settle by letting the pot stay undisturbed for a minute or so. After that is done, slowly pour the coffee into a cup, while remaining careful not to disturb the settled grounds.
Enjoy your coffee!
Method 3: Making The Most Of Coffee Bags
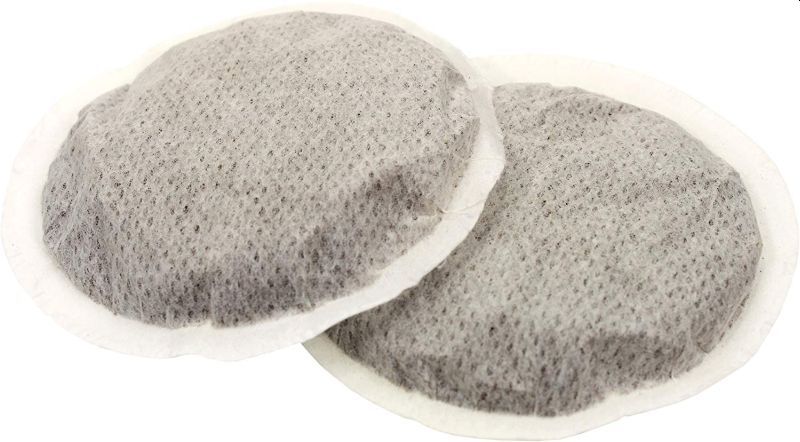
Coffee bags or soft pods are fairly common and are available for use with several coffee makers. Note that this method applies only to coffee bags that are similar to tea bags. It will not work with plastic coffee pods like those used with Keurig single-serve machines. Soft pods like Melitta Coffee Pods work great with this method.
Step 1: Ingredients And Preparation
The best thing about this method is that it doesn’t need much by way of preparation. Heck, you could probably use the Cowboy Coffee method described above; just replace grounds with coffee pods!
- Soft coffee pods or coffee bags
- Hot water
Step 2: Preparing Water
Heat some water in a pot. Remember to go slightly above the requirement for your coffee because the coffee bag will absorb some water. For example, if you want a cup of coffee, add a quarter cup of water extra to heat.
As for coffee pods, they’re usually single-serve, so add a pod for every cup of coffee you want.
Step 3: Placing Coffee Pods
Place the coffee pod in your coffee cup. Now slowly pour water over the pod until you fill the cup. Let it steep for 4-5 minutes depending on how strong you want your coffee. Once the steeping time is over, remove the pod and enjoy your coffee.
Sometimes, it’s a good idea to press the coffee pod with a spoon as you remove it. This allows some of the coffee trapped in the pod back into the cup. That way, you get a stronger drink!
Alternate Method: Creating Your Own Coffee Bag
This is basically the DIY coffee bag method I described for brewing K cups without a coffee maker. This method is best used when you have coffee grounds and a filter, but no coffee pods. We’ll create a DIY coffee pod to use for brewing coffee!
Lay the filter on a flat surface and put the coffee you want at the center of this filter. Wrap the filter around the coffee and tie a string around its edges to ensure that the coffee grounds don’t spill out.
Your DIY coffee bag is ready. Now you can use the method described above to brew your coffee.
Method 4: Pour Over Coffee With Improvised Filter
Pour over coffee is a popular method for brewing a great cuppa. Conventionally, you’ll need a pour over coffee maker and filter. However, since we’re assuming no coffee maker is available, we’ll have to improvise and work without a coffee pot! This section describes brewing coffee in the pour over style without access to a coffee maker or filter.
Step 1: Ingredients And Preparation
- Coffee grounds in medium to fine grind
- Water
- A large coffee mug
- Clips or binders
- Coffee filter or alternatives
- Gooseneck kettle (optional)
To make pour over coffee without filter or paper towel, you can use alternatives like a cotton cloth. A handkerchief can be an excellent choice. Whatever cloth you choose, make sure it is clean and lint-free. Keep in mind, the cloth you use will stain with coffee, and that’s not a stain that will wash off easily.
Another alternative is paper towels. If you choose to use these, use more than one because paper towels are likely to tear. Additionally, make sure that the towel does not include chemicals or other substances that pose a health risk.
A cloth is the better alternative here because it performs the duties of a filter admirably well. Also, the cloth will not tear under pressure of the coffee and water mix of the pour over method.
Step 2: Placing And Securing The Filter
This is the most critical part of the improvised pour over method. We don’t have the luxury of a coffee maker like Hario or Kalita Wave securing the filter. So, we’ll have to ensure that the filter holds its place well through the process.
I suggest using a handkerchief, assuming we’re brewing without filter or paper towel. This is why we need a large coffee mug since the filter is going to commandeer a lot of space.
To start, place the filter (cloth) over the coffee mug. Don’t lay it flat over the opening of the cup. Push it down a bit so that there’s enough room to hold the coffee grounds and some water.
Now use clips, binders, elastics, or whatever you have to secure the filter to the edge of the cup. Make it strong enough to handle some weight.
Step 3: Preparing Coffee And Water
Put the coffee grounds in the filter. Put water in the gooseneck kettle and heat it to the right temperature. Be generous with water because you’ll need more water than the amount of coffee you want.
Putting in an extra cup of water will do the trick. So, if you want to brew one cup of coffee, add two cups of water. If you want two cups of coffee, add three cups of water.
Heat water to the right temperature. Remember, we don’t want boiling water, but a temperature just below boiling is the right fit.
Step 4: Brewing Pour Over Coffee
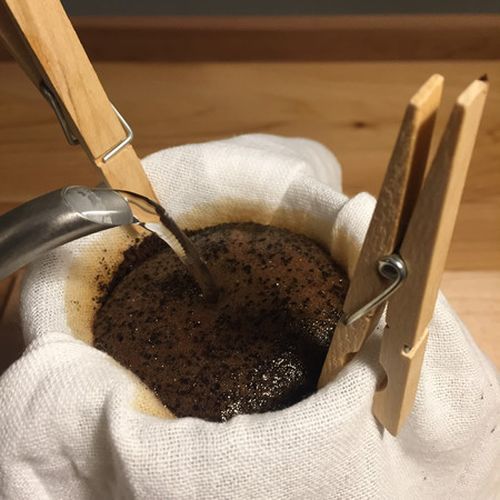
At this point, you can proceed pretty much the same way as brewing a conventional pour over coffee. Pour a thin stream of water over the coffee grounds, while following a circular motion. At this point, pour only enough water to wet the coffee grounds. Stop for about thirty seconds and let the coffee bloom.
Pour water again in a steady stream and while following a circular motion. Stop as the water starts collecting in the filter and allow it to filter through. You might have to repeat this step 2-3 times until the water filters through and the coffee is ready.
Step 5: Enjoy The Coffee
Once you’re done pouring water, wait for a minute or so to allow coffee to filter through. Then carefully remove the filter while ensuring the filter or coffee grounds don’t drop into the coffee mug.
Your coffee is ready.
Method 5: Improvised French Press
Time to improvise the French press for a flavorful, full-bodied cup of coffee. This is a simple and convenient method, for which it gets full points. However, I’m not much of a fan of this method. Cowboy Coffee is an as convenient way smoother option. Anyways, here it is, for the sake of more options.
Step 1: Preparation And Ingredients
- Coffee grounds in medium to coarse grind
- Two large coffee mugs or jars
- Metal strainer (optional)
I’d say an improvised French press really could use a metal strainer. However, if you don’t have a strainer fine enough to work as the faux French press, it’s better to skip it.
Step 2: Adding Coffee And Water
Put the coffee grounds in one of the coffee mugs. Now heat water in a pot to get it to the right temperature. Remember to use more water than what you need for the cup of coffee. This is because some water will be absorbed by the coffee grounds. Quite a bit of water will be left behind as the sludge.
Once water is at the right temperature, pour it into the mug with the coffee grinds. Mix it a bit so that the coffee grounds are uniformly distributed. Let the coffee steep for 3-4 minutes, depending on how strong you want your coffee.
Step 3: Pour The Coffee
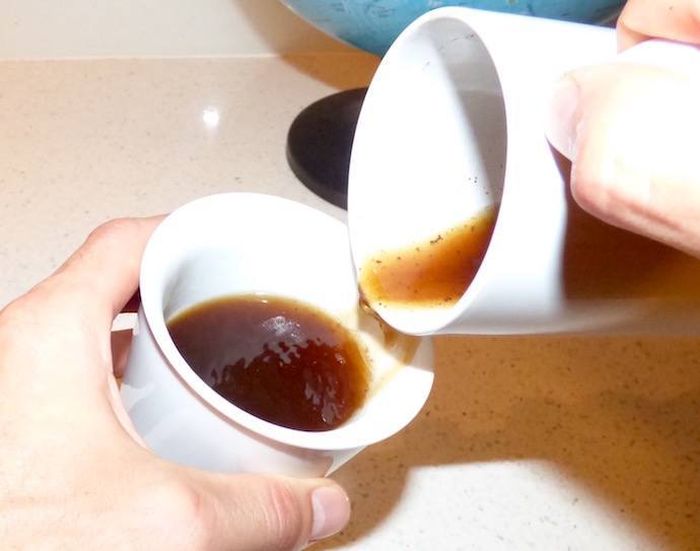
Once the coffee is done steeping and the grounds have settled at the base, it is time to pour it over. If you’re using a strainer, put it over the empty cup. Now carefully lift the cup with the coffee so as not to disturb the settled grounds.
Pour coffee into the empty cup. Leave enough water in the original mug, so the coffee grounds are not disturbed.
The second cup is home to your improvised French press coffee. Enjoy your drink!
Making Coffee Without Coffee Maker
Plenty of coffee makers and competent options are available for us to enjoy our favorite beverage. However, it is useful to know how to make coffee without a coffee maker. It isn’t only for moments where you’re in a bind without a coffee maker.
These are pretty great options for the palate as well! Give Cowboy Coffee and Turkish Coffee a chance and you might just love them!